Tuesday, May 1, 2012

More Fall Fun...Día de Acción de Gracias (Día del pavo)

    Thanksgiving was really fun this year. Most of my students had no idea why we celebrate Thanksgiving and who the Pilgrims were, so we started with two days of lessons on the Mayflower, the Pilgrims and the Wampanoag, and then the Thanksgiving Feast. We used Scholastic's amazing Thanksgiving resources, including the Tour of the Mayflower, Daily Life, and the Thanksgiving Feast. With extra time we also watched the webcast virtual field trips of Plimouth Plantation. I highly recommend taking advantage of all the free resources Scholastic has to offer!
    I also made a Power Point Presentation (saved here as a PDF) in to reinforce what we had learned about the Pilgrim's journey on the Mayflower in Spanish. I used the lesson ideas from Scholastic as well as their interviews with a passenger in this Power Point. Please feel free to download it from me, and use it alongside Scholastic's resources.
This is the title page of the PowerPoint Presentation I made in Spanish to supplement the Scholastic resources on Thanksgiving. You can download it free from the link in the paragraph above. Enjoy!

    After we went through the PowerPoint, I had the students make their own postcards, imagining that they were Pilgrims sailing on the Mayflower. They were really cute and the students really got into the pretending. I gave each student one of the postcard templates and asked them to write a letter to a friend or family member they would have left behind in England or Holland. I wanted them to write about how they were feeling during their trip on the Mayflower. They included conditions of the trip, dreams about life in America, and reflections on leaving home to travel to the unknown. My students never cease to impress me with their thought and creativity.
Download the postcard templates via the link in the paragraph above. I had my students draw a picture of them as a pilgrim on the Mayflower on the opposite side of the postcard.
Once we learned about the history of Thanksgiving, it was time to celebrate! We made Rice Krispie Treat Turkeys and turkey head hats. I found the turkey hat idea, again, on Pinterest but originally from Oriental Trading Co. They were easy for the students to make as an art center, and these hats offered a nice break from the Pilgrim/Native Americans hats.
Ok, well that's enough Thanksgivng for May! I'll see you all soon....really, I swear!

The Tastiest Turkeys There Are

Bah! I haven't been on to blog in MONTHS! I am ashamed :( It is crazy how life can get pretty busy, huh? My dad got remarried, I bought my first house, and the normal craziness of a multiage class has kept me pretty booked solid. Anyway, excuses, excuses, I'm here now to blog about Thanksgiving (wow...in May...that's sad).
My hands-down-favorite Thanksgiving activities to do with my classes are included in this post, as well as the next. Go ahead, get some ideas for next year, and forgive me for my absence :) I plan to be back a whole lot more (if not right away, at least in exactly 22 days when summer vacation starts!)

Rice Krispie Treat Turkeys
Ok, so these are just too cute, it almost hurts. I remember making these all the time with my parents when we were little, so I couldn't wait to bring them into my class. Here's what you need:

-Oreo cookies (one per student)
-Candy corn (about 5 per student)
-Chocolate frosting (I pick chocolate just cause it's my favorite, but you could pick whatever flavor)
-Rice Krispie Treats (you could make your own, but I find it easiest just to break the prepackaged ones in half)


Step One:
Begin by balling up one half of a Rice Krispie treat. I usually wear cafeteria gloves (cause it gets really sticky) and ball them up myself before I give them to the students. This year, however, I had the kids do it themselves and they loved it! I figured, they're going to get messy anyway, so why not let them smush, crunch and squish Rice Krispies themselves?


Step Two:
Split apart an Oreo cookie and attach it (with frosting - the best kind of glue) to the bottom and the back of the Rice Krispie Treat body. 


Step Three:
Using more frosting, add candy corn feathers to the top of the back Oreo cookie and one in the front of the Rice Krispie Treat body to be the beak.


Step Four:
Eat them! This is the messiest, but tastiest and most fun part of the whole process. Enjoy!

Thursday, November 24, 2011

Fun Fall Ideas...for next year

I have to admit I have no idea how the super bloggy teachers do it. With two grades, two languages, and 20 kids, I have no time to post daily, or even weekly. For that reason I must start this post with an apology that these ideas will be of no use to you until next fall. However, when Halloween and Thanksgiving 2012 roll around, I hope you will enjoy these fun crafts and goodies.
Halloween Party Ideas
My head room parent this year doesn't celebrate Halloween, so I got to do the party myself. I was actually pretty excited since the Halloween party is my favorite of the year. I get pretty into the festivities. Take a look at my costume - I was Perry the Platypus from Disney's Phineas and Ferb (my favorite show to watch when I'm home sick!) 


Instead of just giving the students snacks to eat, I had the kids help make their Halloween treats. They turned out really cute and the kids loved making them themselves.
Popcorn Hands
Supplies:
*plastic gloves -the kind food preparers wear, NOT latex first aid gloves. I had a hard time finding these to purchase, so I went to the bakery section of my local Meijer (grocery store) and asked if I could buy a pack from them. They just gave me a free box of 100 gloves, so I'm set for the next 4 years!
*Popcorn - I had a helper mom come in and pop popcorn for us just before the party so it would be fresh.
*Candy corn
*Spider rings

Quick Steps:
Give each student one glove, a cup of popcorn, five candy corn pieces, and a spider ring. They should start by placing the candy corn pieces at the tip of each finger like nails. Then they should fill the glove with their popcorn. I recommend starting with just a little popcorn for each finger, and then filling the hands because otherwise it gets tricky to maneuver and the popcorn gets crunched when you try to squeeze it in the fingers. Finish by tying off the glove end and add a spider ring!

Spooky Owl Cupcakes
I found these cute cupcakes on Pinterest [See the original blog post here]. At my school we aren't allowed to bake anything ourselves for students since there are so many allergies, so I purchased the cupcakes in a variety of Halloween colors from the grocery store. Then I gave each child an oreo, a piece of candy corn and two M&Ms. It was a really quick little crafty snack, so they had more time to try and find a neat way to eat them. They were a big hit and so cute!


Spider Hand Prints
Our final activity was not edible (thank goodness - we had SOOO much food!). Each child was given a piece of paper where I had already drawn and copied a spider web. I went around with help from other adult helpers and painted each student's hand. Though it does take a little longer than just having them dip their hands in a plate of paint, I think it was well worth it. We avoided wasting paint on the plate and I was certain that each student had just the right amount of paint so that their spiders would dry in time to go home. Clean up was easy too, cause they just had to wash their hand! After stamping their painty handprint, the students designed and cut eyes and any other paper features they wanted to add to their spiders. They turned out really well and no one can object to spiders!


HAPPY HALLOWEEN!

Wednesday, November 9, 2011

Monsterously Fun Writing Center

Halloween is my favorite holiday. I guess I never grew up past the phase of loving to play dress up and imagine there is magic in the world. For that reason I go ALL OUT for Halloween in my class each year. In preparation for Halloween week I created a writing center in which the students would write about how they would act, feel, look, and be if they were monsters. This built up their conditional tense writing in Spanish and just looked really stinking cute in the Hallway! So here you go, enjoy!
Step One: Find monster glasses. 
When I was helping my dad clean out his basement this past summer I found a huge bag of these monster glasses. He thinks he got them from Oriental Trading Co. (my favorite) for really cheap. I had each of my students pick their favorite of the glasses and wear them for a picture. I took these in advance so that I could print them and have them ready for the students when they did the center. The kids LOVED IT! There were so many giggles :)

Step Two: Gather supplies. 
For the writing center I gave each child a long piece of black paper, a die cut frame in neon colors, their picture of their monster glasses, and a "Si fuera un monstruo" writing paper.

Step Three: Write your monster story. 
The students looked at their pictures and used their imaginations to write all about what they would do if they were monsters. Here's a sample of one of my student's work and the translation:

"If I were a monster...I would go outside of my house and scare everyone. I would leave and walk around outside and scare people. I would be worried that they would take me to jail or call the police. I would miss my parents and wouldn't want to go."
I thought her's was so cute - she really got into character and was thinking about the repercussions of her actions. I guess our character traits teaching is working :)
Step Four: Put it all together.
Once they finished writing I had the students color the monsters on the paper and put their page together. We had the picture up top with the frame, and then glued the writing page below it. I hung them outside our room in the hallway. We have gotten so many compliments from parents and teachers. I can't wait to do this again next year. Best of all, it doesn't have to be Halloween themed - you can use monsters anytime!

Thursday, October 13, 2011

Munching on Matter

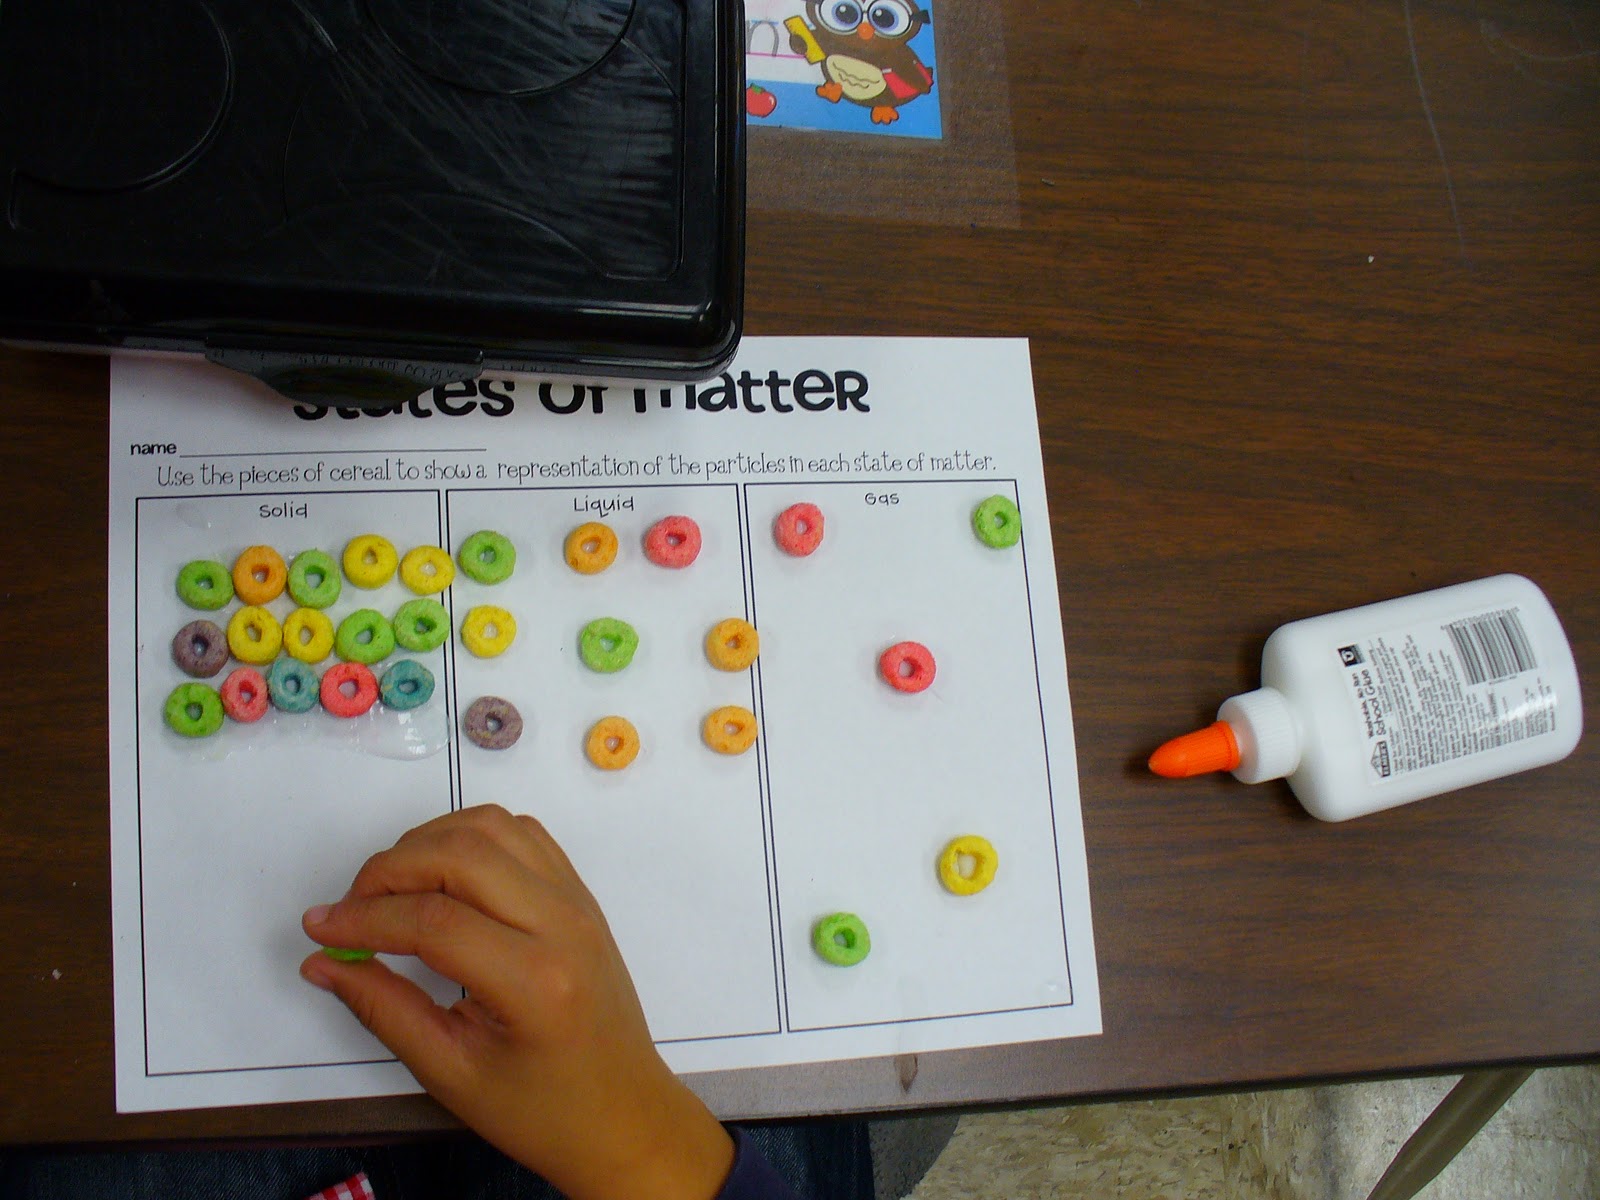
We're studying matter in science right now, and what better way is there to learn about science than to eat it? Here are a few matter ideas I stole from the web. Check out my pics and follow the original links to the amazing teachers who came up with the ideas.

1. Matter's Molecules with Froot Loops
States of Matter Froot Loops paper thanks to Tales of Frogs and Cupcakes

Froot Loops Matter Bulletin Board thanks to Beth Sawyer


2. Checmical and Physical Changes with s'mores
After our study of the states of matter, we learned all about changes in matter. For the section on physical and chemical changes, I thought it would be most fun to see the difference between these two processes by making and eating s'mores. Many of my students had never heard of or made s'mores before so it was a real treat!
Chemical Changes:
-Burning the marshmallow     
-Eating the s'more               
Physical Changes:
-Breaking the graham cracker
-Melting the chocolate           

 I was inspired to use the s'mores activity by the lesson idea I found on superteacherworksheets.com. The idea was originally submitted by Diana, a 7th grade teacher from Kentucky.


CHAMPS in my classroom

CHAMPS (which stands for Conversation, Help, Activity, Movement, Participation, and Supplies) was introduced to our school at the end of last year. During our back to school staff meetings this year, each of us teachers received a CHAMPS board made especially for us by our wonderful TAB and SEDOL ladies. Here is my board:
I use this board everyday with my students. Before we start a new activity or lesson I just switch the cards around to provide a visual reminder for students of the behavior expected of them.

Conversation: I use the numbers 0-4 to tell the students the voice levels they should be using (0 = silent, 1 = whisper, 2 = group work, 3 = whole class, 4 = gym/recess only)

Help: This category tells the students the ways in which they can get help if they need it. On the board posted you can see that students can raise their hands or ask a buddy. I also have a card for walking up to the teacher's desk and for re-read the directions. It is important to remind students that if the card is not shown, it means you should NOT use that method for help. For example, the teacher isn't shown here because this is the board set up for centers work, and I am with a guided reading group and cannot be interrupted.

Activity: There are probably twenty different cards for this section of the board. You can see the seat work picture shown, but I also have cards for group work, tests, reading, art projects, game playing, computer time, writing workshop, etc. I use the three different velcro dots to put the activities in order for students so they know what they are expected to do next.

Movement: This is probably my favorite category, and definitely the most helpful. Movement tells the students what they are allowed to do during the activity. You can put up the bathroom, drinking fountain, pencil sharpened, book shelf, and many more cards to show when and how students are permitted to move around the room. I am also planning to make some cards with the "not" sign (like on a no smoking sign) to re-emphasize when it is not appropriate to get up and go to the bathroom, get a drink, or sharpen pencils. Providing the students with visual reminders of these rules has helped keep students from getting up while I'm teaching or giving directions.

Participation: The participation category is a reiteration of the help and activity sections rolled into one. It shows students how we will be working; whether it may be in centers, independently, as table groups, or as a whole class.

Supplies: I added supplies onto the board myself, so that's why you don't see the pieces up yet. I made different cards of our textbooks, notebooks, and school supplies to help show the students what they will need for each lesson of the day. This saves me a lot of time explaining to students what they need to get out. I love this category!

*Oh, and please note that the velcro dots across the top are for the subject cards. This way I can put up "math" or "centers" to specify what the board is for.

Friday, September 2, 2011

Math with M&Ms

One of the first things my students learn about me each year is that my favorite food is chocolate. For this reason, I try to incorporate chocolate into my lessons whenever I can (in moderation, of course). M&Ms make incredible math manipulatives, so I thought I'd dedicate this post to my M&M math resources.


At the beginning of first grade we work on mastering the recognition of basic numbers through dot patterns. Think of it like the numbers you see on dice. These are the same patterns we use to help students learn to visually recognize numbers quickly. Since dot patterns just use little circles, I figured it would be way more fun and motivational to use M&Ms to make our dots! Here are some pictures of the dot pattern mat I made and of my students creating dot patterns.
We teach the dot patterns for the numbers 1-9, so there are enough boxes for each number pattern.

I also found that this same mat can be used for a lot more than just dot patterns. I had the second graders in my class use this activity the next day, except they used the three boxes to make addition and subtraction sentences.

For example, the first box would contain 3 M&Ms, the second box 2 M&Ms, and the third box 5 M&Ms. Then, in between the boxes they would add the addition sign and the equals sign. When they were finished they ended up with the addition sentence 3 + 2 = 5 all in a wonderful, chocolatey and edible form!  I also plan to use this same mat when we practice place value for three digit numbers. I am convinced the possibilities are endless!